win7垃圾批处理器设置方法 win7垃圾批处理器编辑教程
Win7操作系统是目前仍然被大量用户使用的系统之一,然而随着时间的推移,系统中会产生大量的垃圾文件,占用宝贵的存储空间并影响系统运行速度,为了解决这一问题,我们可以通过设置垃圾批处理器来定期清理系统垃圾文件。接下来我们将介绍Win7垃圾批处理器的设置方法和编辑教程,让您的电脑始终保持清爽和高效。
win7垃圾批处理器编辑教程:(一键u盘装win7)
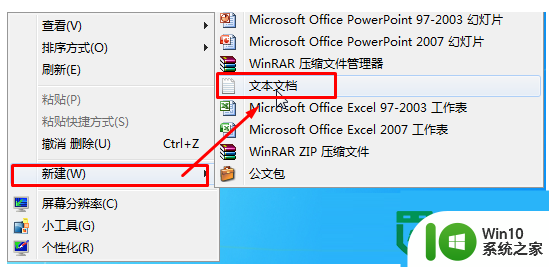
1、新建一个txt文本文件;
2、打开文本文件,输入以下内容:
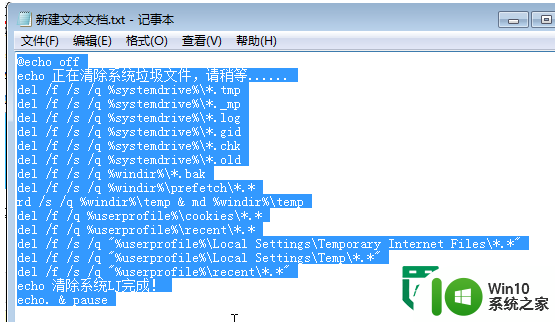
@echo off
echo 正在清除系统垃圾文件,请稍等......
del /f /s /q %systemdrive%\*.tmp
del /f /s /q %systemdrive%\*._mp
del /f /s /q %systemdrive%\*.log
del /f /s /q %systemdrive%\*.gid
del /f /s /q %systemdrive%\*.chk
del /f /s /q %systemdrive%\*.old
del /f /s /q %windir%\*.bak
del /f /s /q %windir%\prefetch\*.*
rd /s /q %windir%\temp & md %windir%\temp
del /f /q %userprofile%\cookies\*.*
del /f /q %userprofile%\recent\*.*
del /f /s /q "%userprofile%\Local Settings\Temporary Internet Files\*.*"
del /f /s /q "%userprofile%\Local Settings\Temp\*.*"
del /f /s /q "%userprofile%\recent\*.*"
echo 清除系统LJ完成!
echo. & pause
3、点击“文件”--“文件另存为”,文件名的结尾从txt改为bat,保存类型选择“所有文件”;

右键保存出来的bat文件,以管理员身份运行即可。
以上就是win7垃圾批处理器设置方法的全部内容,还有不清楚的用户就可以参考一下小编的步骤进行操作,希望能够对大家有所帮助。
